The Sugar user interface consists of various modules designed to help you manage customer-related records such as contacts and accounts,. Each module, representing a record type, groups the tools and functions needed to perform specific tasks. This enables you to work more efficiently.
Record types can be related to one another. For example, a contact can be related to a specific account. When you view a specific record in Sugar, the system also displays related records. Therefore, when you view a specific account, information on the related contacts are displayed in a sub-panel.
When you log in, the Home module displays on the screen. Tabs for other modules display alongside the
Home tab.
|
•
|
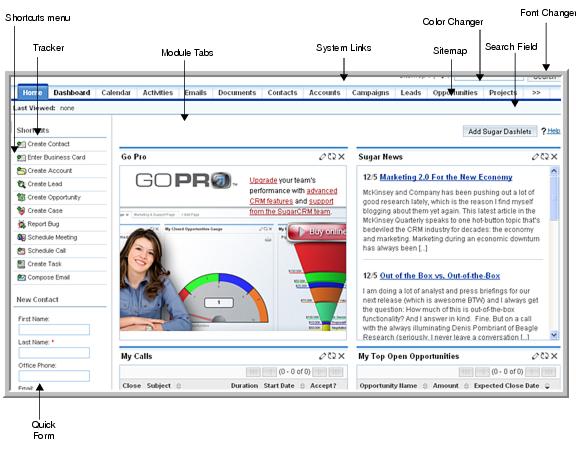
System links. System links, located at the top right-hand corner of the page, are common to most modules. They allow you to access your profile information, Sugar University, the employee list in your organization, Sugar version information, and log out of the system. Administrators can view and access the Administration Home page to perform their tasks. For more information, see “System Links” on page 13.
|
|
•
|
Color Changer. To change the page color, click the desired color option located next to the About link at the top of the page.
|
|
•
|
Font Changer. To increase or decrease the font size on the page, click the appropriate font option located next to the Color Changer.
|
|
•
|
Sitemap. The Sitemap enables you to view how Sugar modules are organized. Click the Down arrow to view the map. You can navigate to a page by selecting it from the list.
|
|
•
|
Home. This page displays your scheduled activities and assigned records. You can click a record to view its details.
|
|
Note:
|
If you are using the Sugar theme or the Bold Move theme, you can change the color and font size in Sugar by clicking the appropriate box located next to the About button at the top of the page.
|
All modules, including the Home module, display most of the following system links:
Logout. Click this link to log out of the system. It is recommended that you always log out of the system instead of only closing your Web browser. When you log out, the system performs several clean-up procedures, and then automatically returns the Web browser window to the Login screen.
My Account. Click this link to enter or edit your profile information such as a change in home address, Email address, or phone number. For more information, see
“Setting Your Preferences” on page 4.
Employees. Click this link to view a list of other users in your organization. This list, maintained by the administrator, displays employee information such as name, department, supervisor, and Email address. You can click an employee’s name or a supervisor’s name to view detailed information on that individual. You can click an employee’s Email address to send an Email to that person.
Administrators can create new employee records. Users can view a list of all employees, search for specific employees, and change an employee’s status to Active or Inactive.
Admin. The
Admin link is only visible to users who have administrator privileges. Administrators can select this option to perform tasks such as managing system and user settings. For more information, see the chapter on System Administration.
Training. Click this link to view Sugar University, which offers you a self-paced training program to learn how to use Sugar.
About. Click this link to learn more about SugarCRM and view version information. This link also provides credits and valuable source code references.
Sugar displays a maximum of 12 module tabs on the screen. To view a specific module, click the appropriate tab. To view any of the remaining modules, click the
>> arrow that displays on the right and select from the drop-down list. When you select a tab from the drop-down menu, it replaces the tab that previously displayed to the right.
|
•
|
Home. The Home module provides a quick overview of your customer-related tasks and activities. For more information, see “Home Module” on page 32.
|
|
•
|
My Portal. Click this tab to view the My Portal module. You use this module to create shortcuts to one or more Web sites. This is commonly used to include Email, forums, or other Web-based applications, enabling Sugar to become a single user interface for multiple applications. For more information, see “My Portal Module” on page 34.
|
|
•
|
Calendar. Click this tab to view the Calendar module. You use this module to view scheduled activities (by day, week, month, or year) such as meetings, tasks, and calls. You can also share your calendar with your coworkers to coordinate your daily activities. For more information, see “Calendar Module” on page 36.
|
|
•
|
Activities. Click this tab to view the Activities module. You use this module to create or update scheduled activities, or to search for existing activities. Activities consist of the following:
|
|
•
|
Calls allow you to track all of your phone calls with leads and customers.
|
|
•
|
Meetings allow you to schedule internal or external meetings, as well as receive meeting invitations from others.
|
|
•
|
Tasks are for tracking any action that needs to be managed to completion by a due date.
|
|
•
|
Notes allow you to capture note information as well as upload file attachments.
|
|
•
|
Contacts. Click this tab to view the Contacts module. You use this module to track people involved in doing business with your organization. You can track a variety of contact information such as title, Email address, and phone number. Contacts are usually linked to an account, although this is not required. For more information, see “Contacts Module” on page 47.
|
|
•
|
Accounts. Click this tab to view the Accounts module. You use this module to manage your customers. You can track a variety of information about an account including Web site URL, address, number of employees and other data. Business subsidiaries can be linked to parent businesses in order to show relationships between accounts. For more information, see “Accounts Module” on page 53.
|
|
•
|
Leads. Click this tab to view the Leads module. You use this module to track individuals or companies who are potential customers. Leads are typically fed into the Sugar system automatically from your Web site, trade show lists or other methods. However, you can also manually enter leads into Sugar. For more information, see “Leads Module” on page 56.
|
|
•
|
Opportunities. Click this tab to view the Opportunities module. You use this module to track potential customers. Opportunities help you manage your selling process by tracking attributes such as sales stages, probability of close, deal amount and other information. For more information, see “Opportunities Module” on page 60.
|
|
•
|
Cases. Click this tab to view the Cases module. You use this module to help Customer Support manage product problems and inquiries by tracking information for each case such as its status and priority, the user assigned, as well as a full trail of all related open and completed activities. For more information, see “Cases Module” on page 63.
|
|
•
|
Emails. Click this tab to view the Emails module. You use this module to send, and receive emails. You can also automate Email management, create Email templates for automated responses, and for Email-based marketing campaigns. If you use Microsoft Outlook, you can quickly archive Email messages with the Sugar Plug-in for Outlook. For more information, see “Emails Module” on page 71.
|
|
•
|
Bug Tracker. Click this tab to view the Bug Tracker module. You use this module to report and track bugs associated with a product. Customer support representatives can manage software-related support problems or inquiries to completion by tracking information for each bug such as its status and priority, its resolution, the user assigned, the release of software involved, its type (defect or feature) as well as a full trail of all related open and completed activities. For more information, see “Bug Tracker Module” on page 65.
|
|
•
|
Documents. Click this tab to view the Documents module. You use this module to view a list of documents that you can download. You can also upload your own documents, assign publish and expiration dates, and specify which users can access them. For more information, see “Documents Module” on page 68.
|
|
•
|
Campaigns. Click this tab to view the Campaigns module. You use this module to create and manage marketing campaigns. You can implement and track marketing campaigns. Campaigns may be telemarketing, mail or Email-based. For more information, see “Campaigns Module” on page 94.
|
|
•
|
Projects. Click this tab to view the Projects module. You use this module to track and manage tasks for multiple projects. Tasks can be assigned to different users and assigned estimated hours of effort. As tasks are in progress and completed, users can update the information for each task. For more information, see “Projects Module” on page 117.
|
|
•
|
RSS. Click this tab to view the RSS (RDF Site Summary) module. Use this module to view and manage news and other Web content syndicated by Web sites. View the latest headlines provided by your favorite RSS feeds. These feeds provide news or other web content that is distributed or syndicated by Web sites. The system provides hundreds of RSS feeds, and you can easily add others. For more information, see “RSS Module” on page 121.
|
|
•
|
Forums. Click this tab to view the Forums module. Use this module to create one or more forums to discuss general, technical, or sales topics. For more information, see “Forums Module” on page 125.
|
Sitemap: A list of links to all the pages in the Sugar Graphical User Interface. You can click on any link to navigate to that screen in Sugar.
Search Box: A Search box for global search displays above the module tabs. For more information, see “Global Search” on page 28.
Last Viewed: The bar below the Search box displays a useful trail of recent records that you have viewed. Administrators can view a trail of all users who recently viewed records.
Shortcuts: Displays options to perform necessary tasks in one or more modules. The options vary depending on the module you select.
Quick Form: A quick entry form to create a new record for the module. This form differs from the
fields displayed when you select the Create option in the
Shortcuts menu. A quick form only displays required fields to create a new record and uses default values where available. After you save the new record, you can change the default values if necessary and enter information for the optional fields.
Theme. A theme specifies the appearance of the User Interface such as page formatting, fonts and colors. Sugar provides several themes. The default theme is named
Sugar. At the bottom of every page, you have an option to select a different theme from the
Theme drop-down list.
Print. Click this option to view a printable version of the page. You can then print it using your browser’s Print option.
Help. Click this option to view information about the page.