Use the Documents module to create and manage files that you share with users and contacts.Use the Documents module to create a library of documents and graphics that you can share with other users and contacts. You can create a variety of documents ranging from marketing collateral to contracts. You can also create templates for frequently used documents.
|
1.
|
In the Shortcuts menu, click Create Documents.
|
|
2.
|
.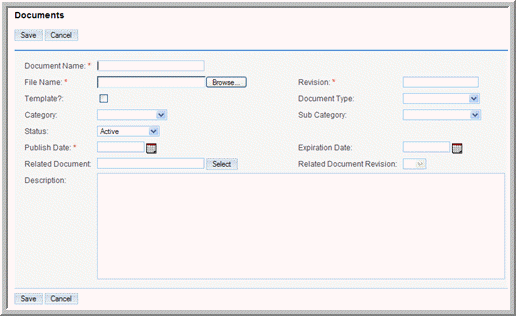 On the Documents page, enter information for the following fields:
|
File Name. Enter the name of the file you are using to create the document; click
Browse to navigate to the location of the document.
Revision. If you revised this document, enter the revision number.
Template. Select this box if you are creating a template.
Document Type. Select a pre-defined document from the drop-down list. If the document does not belong to any of the listed types, select
None.
Category. Select a pre-defined category from the drop-down list. If none of the categories apply, select
None.
Sub Category. If you selected a category, select the category subset if applicable.
Status. From the drop-down list, select the status to indicate the current state of the document such as
Draft or
Under Review.
Publish Date. Click the
Calendar icon and select the date when the document is published for other users to view and download it.
Expiration Date. Click the
Calendar icon and select the date when the validity of the document expires. For example, collateral for a sales campaign may not be useful after the campaign ends.
Description. Enter a brief description of the document.
|
3.
|
Click Save to create the document; click Cancel to return to the document list without saving the document.
|
Any file that you attached when you created the document displays on the detail page in the
Download File field. Click the attachment to open it or to save it to your local machine. Right-click the attachment to bookmark it, copy it, and to view its properties.
|
1.
|
In the Document Revisions sub-panel of the document’s detail page, click Create.
|
The Documents Revision page displays on the screen. The current document name and revision number appear on this page.
FileName. Enter the name of the file containing the revised information; to navigate to the file location, click
Browse.
Revision. Specify a revision number for the revised document.
Change Log. Enter a brief description of the revision.
|
3.
|
Click Save to save your changes; click Cancel to go back to the document detail page without saving your changes.
|
In the Documents module, you can identify Microsoft Word mail merge templates. These templates are used when a mail-merge is performed directly from within Sugar. The templates themselves can be created from the Sugar Plug-in for Microsoft Word and uploaded to the Sugar document repository.


icon beside it; to reverse the sort order, click the column title again.