![]()

|

|

|

|
Sugar Express User GuideVersion 5.5.0 Beta 2 |
Use the Calendar module to view and to create activities such as appointments, calls, meetings, and tasks.To view your calendar by day, week, month or year, click the appropriate button at the top left of the main screen. In each format, any planned activities with associated dates are displayed – such as Calls, Meetings, Tasks, Notes and emails. Icons are used to indicate the type of activity:for a call,
for a task, and
for a meeting. You can click any activity on your calendar to edit the information.
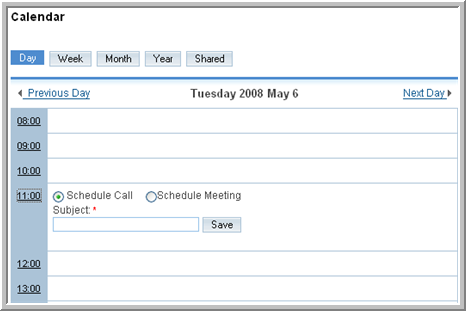
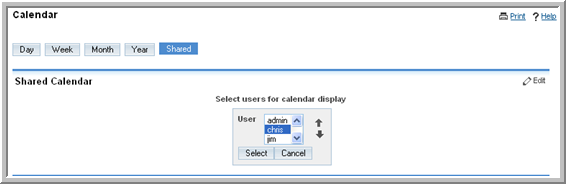
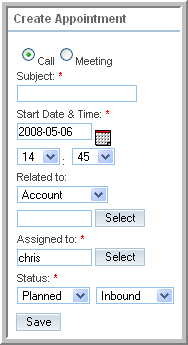
You can move backwards and forwards in the calendar- by one day, week, month or year. In the week, month or year format, you can click on any date to view it in day format.In the Calendar Options sub-panel of your My Account page, you can create a Publish Key to allow users of other applications such as Microsoft Outlook to view your calendar. For more information, see “To set or edit your profile and preferences” on page 5.The Shortcuts menu of the Calendar Home page displays the following options that are part of the Activities module:Schedule Call. Click this option to schedule a call as described in “To schedule a call or a meeting” on page 41.Schedule Meeting. Click this option to schedule a meeting as described in “To schedule a call or a meeting” on page 41.Create Task. Click this option to create a task as described in “To create a task” on page 44.Calls. Click this option to view and manage calls as described in “To manage calls and meetings” on page 43.Meetings. Click this option to view and manage meetings as described in “To manage calls and meetings” on page 43.Tasks. Click this option to view and manage tasks as described in “To manage tasks” on page 45.For any scheduled call or meeting you can create a related note or attachment. For example, you can add a note summarizing the outcome of a call or a meeting.You can also perform other activities related to a call or a meeting, such as creating a task and archiving emails. For more information, see “Activities Module” on page 40.In Day format, the calendar lists the hours of the day vertically. A list of existing tasks displays on the right side of the main calendar body. To view the details of a task, click its subject title.When you save the information, the system displays the detail page where you can view and manage related information such as contacts and notes.Users can view each other’s calendars in order to schedule appointments. As a user, the information that you can view in a colleague’s calendar depends on your team membership. For example, if you have an appointment on your calendar that is assigned to the Global team, all users in your organization will be able to access the appointment details when they view your calendar. However, if the appointment is assigned to your private team, they will only be able to see whether you are free or busy but will not be able to view the details. If the appointment is assigned to the East team, then only members of that team can view its details.Managers have permissions to view, edit, and delete their subordinates’ appointments. Subordinates can only view their Manager’s appointments as free/busy time. Administrators have full access to any user’s calendar and the permissions to edit, duplicate, and delete any appointment.
|
|
|
|
|
Copyright 2004-2009 SugarCRM Inc.
Sugar Express License