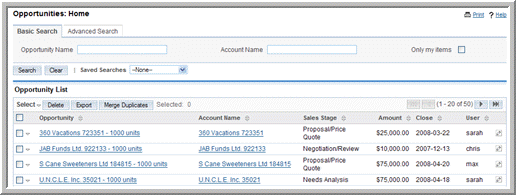
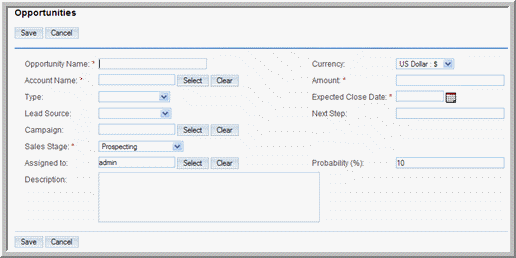
Every opportunity must be associated with an account. You can associate an opportunity with only one account but you can associate it with multiple leads and contacts.An opportunity specifies the estimated sales amount for an account and is tied to a sales stage. A sales stage, such as Qualification, Closed Won, or Closed Lost identifies how close you are to making a sale. The administrator defines and sets the sales stage depending upon the requirements in your organization. The estimated sales amount can vary depending on the sales stage.Based on the sales stage, the system calculates the probability of a sale. For example, at the Proposal sales stage, the system calculates the probability as 80%, and at the Negotiation sales stage, probability increases to 95%.You can associate an opportunity with a campaign to track the campaign’s effectiveness in generating opportunities for your organization. Any campaign-related opportunity that generates revenue is reflected in the campaign’s ROI (Return on Investment) chart. For more information, see “Viewing a Campaign’s Return on Investment” on page 111.
1. Alternatively you can use the Create Opportunity quick form displayed below Shortcuts. This form contains only the required fields. You can enter information for optional fields after you save the form.
2. On the Opportunities page, enter information for the following fields:Opportunity Name. Enter a name for the opportunity.Account Name. Enter the name of the account related to the opportunity. To choose from the list of existing accounts, click Select.Type. From the drop-down list, specify whether the opportunity is from an existing customer or a potential customer.Lead Source. From the drop-down list, specify the lead source such as Trade Show or Cold Call.Campaign. To associate an opportunity with a campaign, enter the campaign name or click Select to select it from the Campaigns list.Assigned to. Enter the name of the individual who is responsible working on the opportunity. To choose an existing user, click Select, and choose the person from the User List. By default, this is assigned to you.Amount. Enter the estimated amount of the closing a sale.Expected Close Date. The expected or estimated close date for this particular opportunity.Next Step. Enter the next step in closing a sale.Sales Stage. The current stage of this opportunity.The value specified for the Sales Stage determines the default value displayed in the Probability field on the Opportunity page.Probability (%). The system determines the values for this field based on the selected Sales Stage value.For example, if the Sales Stage value is Closed/Won, then the probability changes to 100%. However, you can manually change the Probability % value.Description. Enter a brief description of the opportunity.
3. Click Save to create the new opportunity; click Cancel to return to the Opportunity home page without saving the information.
• To sort a list view, click any column title which has theicon beside it; to reverse the sort order, click the column title again.
• To edit or delete some or all the listed opportunities, use the Mass Update sub-panel as described in “To edit or delete multiple records” on page 19.
• To import records, click Import in the Shortcuts menu of the Home page. For more information on importing data, see “Importing Data” on page 129.
• To export records, select them from the list, click the Export link and follow the process described in “Exporting Data” on page 137.
• To merge duplicates, click the Merge Duplicates link and following the process described in “To merge duplicate records from the list view” on page 25.
• To duplicate an opportunity, on the detail page, click Duplicate. Duplication is a convenient way of creating a similar opportunity. You can change the information in the duplicate record to create a new opportunity.
• To track changes to an opportunity over time, click the View Change Log link.
Copyright 2004-2009 SugarCRM Inc.
Sugar Express License