Access emails. You can view and process emails on external mail servers without downloading them into the Sugar database.
Import emails. You can import emails into Sugar from external mail servers. The emails module provides a folder named
My Email for this purpose. You can associate an imported email with a Sugar record such as a bug or an account. This creates a thread of email communication related to that record for future reference.
Archive emails. You can copy emails sent to external accounts into Sugar. For example, emails in Microsoft Outlook using the Sugar Plug-in for Microsoft Outlook. Archiving emails creates an email record in Sugar.
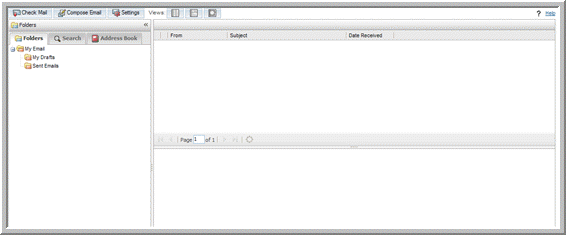
The default layout of the Emails module divides the page into three panels: the left panel displays the Email folders tab, address book tab, and search tab; the top of the middle panel lists email messages, and the bottom of the middle panel displays the contents of the email selected from the list above. You can select a different layout by clicking the desired Views icon.
Sugar supports POP3 and IMAP protocols to access your external mail accounts. You can also send the emails that you compose in Sugar through any of your external mail accounts.
The IMAP protocol retains the folder structure on the Email server. When you select the IMAP protocol, you can limit access in Sugar to specific folders from your external mail account. You can also add a Trash folder for emails that you want to discard and a Sent folder to store emails that you sent out.
The Email settings in Sugar are designed to help you automate many of your email management actions, such as responding to emails, importing emails, and deleting emails. Some settings have been pre-configured with default values. Other settings are optional. You can customize email settings to suit your requirements.
General settings include options such as configuring the page layout and automatically checking email accounts. Some of these settings have default values, which you can change. General settings apply to all your mail accounts in Sugar.
|
1.
|
Click Settings at the top of the page.
|
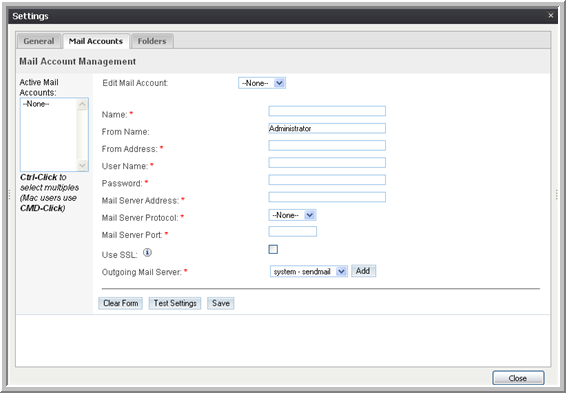
The Settings window displays the default configuration
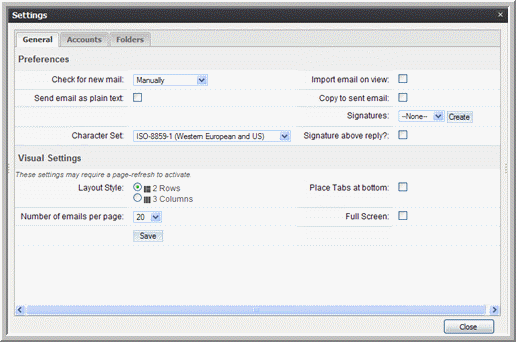
Check for New Mail. If you want the system to automatically check your mail accounts for new emails, select a time interval from the drop-down list. The default setting is for you to manually check for emails.
Copy to Sent Email. Select this box to store a copy of your outbound email messages in the Sugar database.
Character Set: From the drop-down list, specify the default character set for outbound emails.
Signatures. From the drop-down list, select a signature for your outbound emails. To create a signature, click
Create, enter your full name and format your signature as HTML or plain text.
Layout Style. Select an option to view the contents of the Emails page, namely the Sugar inbox, the message body, and the Email folders. You can view them in a two column format or a three column format.
Place Tabs at Bottom. Select this box to display the tabs for Folders, Search, and Address Book at the bottom of the page.
Full Screen. Select this box for a full-screen display of the Emails page.
You can send emails using the default mail account set up by the administrator. However, if you want to access your external mail accounts through Sugar, you will need to set up a mail account in Sugar for every external mail account that you want to access. You can import these emails into Sugar if needed. You can also specify a mail server for outbound emails that you can use instead of the default server that the administrator has set up to send emails.
A mail account can be an individual mail account or a group mail account. Users can set up individual mail accounts for themselves. Administrators can set up group mail accounts to distribute emails among users. As a user, you can subscribe to a group mail account that your administrator has created.
To retain the folder structure that exists on the external Email server within Sugar, you will need to use the IMAP protocol. With the IMAP protocol, you can limit access to specific folders on your external account.
|
1.
|
Click Settings at the top of the page.
|
The Settings window displays on the page
Name. Enter a name for the account.
User Name. Enter the sender’s user name. Some Email servers may require this to be the sender’s email address.
Mail Server Address. Enter the address of the Email server from which emails will be viewed in Sugar.
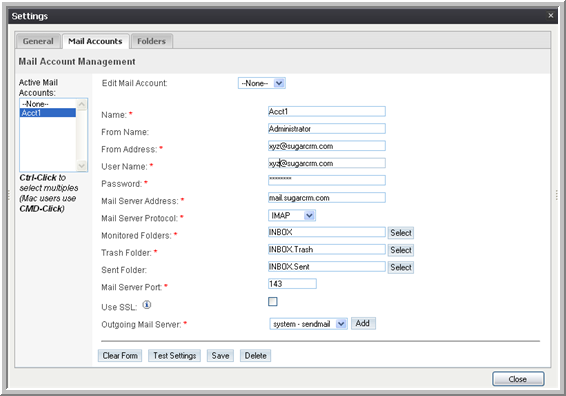
Monitored Folder. Click
Select to view a list of available folders on the external mail account. After you select the folders that you want to view in Sugar, click
OK. To select multiple folders, hold down the Shift key or the Ctrl key. The selected folders display in your inbox and you can view their contents.
Trash Folder. To select a Trash folder from the Folders list, click
Select. After you specify a folder, click
OK.
Sent Folder.To add a folder to view your outbound emails, click
Select. After you specify a folder, click
OK.
Mail Server Port. The system automatically populates this field with the port number for the selected protocol.
Use SSL. Select this box if you are using
POP3 and
your
external mail account requires SSL. You can also use SSL with IMAP to access a gmail account.
|
4.
|
Click Test Settings to ensure that the settings are correctly configured.
|
|
5.
|
Click Save to create the mail account.
|
The mail account displays in the Active Mail Accounts list on the left, and is highlighted to indicate that the account is selected and you can view emails in it. All mail accounts that you create display in this list. When you deselect an account, you cannot view emails in it. Group mail accounts that you are allowed to access also appear in this list. Use Ctrl-Click (Windows) or CMD-Click (Macintosh) to select multiple accounts.
|
1.
|
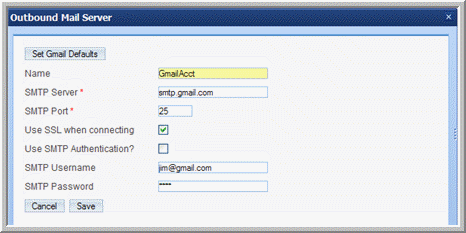
Click the Add button located next to the Outgoing Mail Server drop-down list.
|
Name. Enter a name for the account.
SMTP Port. Enter the mail server’s port number.
|
3.
|
Click Save to add the mail server; click Cancel if you do not want to add the mail server.
|
Sugar also provides a local folder named My Email where emails imported into Sugar and emails that are assigned to you, your teams, and your direct reports reside. For your use, the My Email folder contains two sub-folders named
My Drafts and
Sent Emails. Emails in all three folders are stored in the Sugar database.
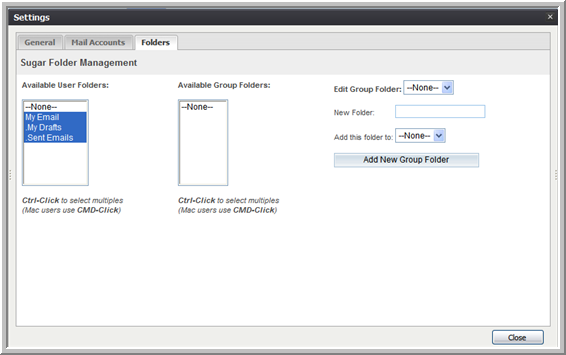
Only administrators can create Group folders. Every Group folder is assigned to a user and only that individual can view the folder and its contents. Administrators use Group folders to distribute emails among users for necessary action. Typically, these are emails for product bugs and cases that are addressed to your organization and not to any particular user. You can manually place emails in the Group folder. When you move emails into a Group folder, they are imported into the Sugar database. Administrators can associate the Group folder with a Group mail account to automatically import incoming emails into the Sugar database.
For information on creating Group folders, see the Sugar Express Installation and Administration Guide.
You can view all local folders in the Folders tab of the Email Settings page. In order to view a folder in the Folders tab of the Emails home page, you must select it in the Folders tab of the Email Settings window.
|
1.
|
In the Folders tab in the Emails home page, right-click My Email and select Create Folder. 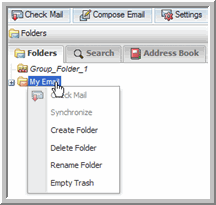
|
The Add New Folder dialog box displays on the page.
The new local folder is now listed under Folders in the left-hand panel. This folder is not associated with any of your mail accounts. You can import emails into this folder from any of your mail accounts.
From the Emails module, you can send out emails to users, contacts, leads, and other external individuals and organizations. When you compose an email, you can choose the mail account from which to send the email.
By default, the system uses the email settings specified in the General tab. These include the signature and email import options. However, when you compose an email, you can change some of these options for it. You can also specify additional options such as an email template and a different character set.
|
2.
|
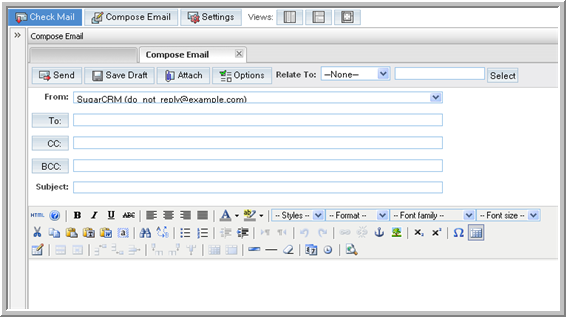
On the Compose Email page, enter information for the following fields:
|
|
3.
|
From. To route the email through a specific mail account, click the down arrow to select an existing one from the drop-down list. The list contains all the outbound mail account servers that you set up.
|
To. Specify the names of one or more recipients. You can do this in several ways: You can manually enter names; you can click the
To button to search through the Address Book entries for emails addresses of users, leads, contacts, and targets and add the ones you want; You can also drag and drop names from the address book.
Subject. Enter the subject of the email.
Enter the email text in the body field. Highlight the text and click buttons on the toolbar to apply standard formatting options such as font face, size, bold, italics, indentation and color. Additional buttons insert rules, hyperlinks, pictures, table and display the HTML source code. To send an email in HTML format, click the HTML link on the toolbar and type the contents in HTML format in the HTML Source Editor window.
|
9.
|
To send the email, click Send; to save the email as a draft, click Save Draft. The saved drafts appear in the My Drafts folder.
|
By default, the Copy to Sent email box in the
Options window is checked to save a copy of the email in the
Sent folder in Sugar. For IMAP accounts, if you selected a Sent folder, the email will be copied to the Sent folder on the email server even if you do not choose to copy the email into it. After an email has been dispatched, it is listed in the
Sent Emails folder.
|
1.
|
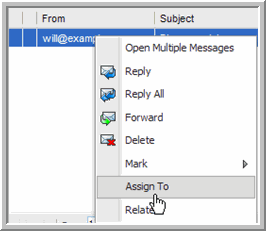
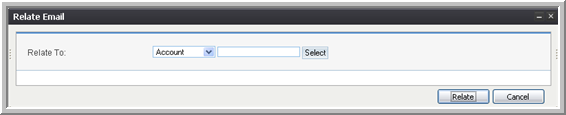
Select the email from the Sent Emails folder, right-click, and select View Relationships, or when the email’s content displays in the panel below, click View Relationships.
|
You cannot use the Check Mail button to check for new emails in the Group mail accounts. Sugar uses the Scheduler to update Group mail accounts with incoming emails.
The Relate Email dialog box displays on the screen.
|
c.
|
Click Relate to create the association.
|
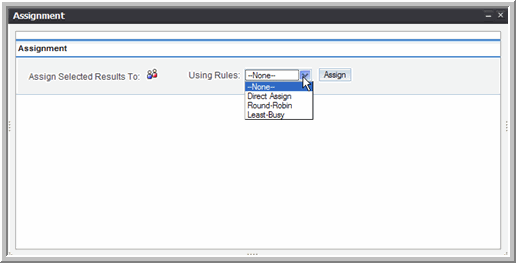
The Assignment dialog box displays on the screen.
|
b.
|
Click the Users icon to view a list of existing teams and team members. 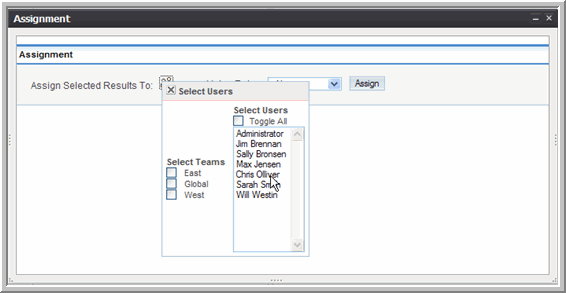
|
Direct Assign: Use this option to assign the email to a specific user.
Round Robin: Use this option to assign emails evenly between two or more selected users.
Least Busy: Use this option to assign emails to the user who has the shortest queue of assigned emails.
The Import Settings dialog box displays on the screen.
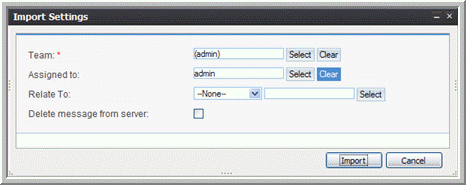
Team. Click
Select to select the team that will be assigned the email.
Assigned to. Click
Select to select a specific user within the team.
Relate To. Optionally, select a module and then click
Select to choose a record within the module with which to associate the email.
|
3.
|
Click Import to import the email into the Sugar database; click Cancel to return to the Sugar inbox without importing the email.
|
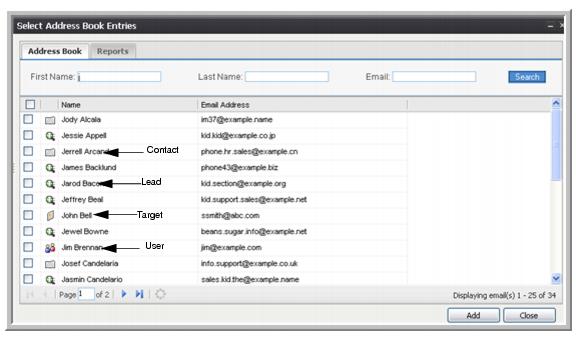
You can populate the Email address book with email addresses of individuals with whom you frequently correspond. You can select individuals from your list of contacts, leads, targets, and users.
The advantage of using an address book is that the system automatically displays a drop-down list of names and email addresses when you enter the first letter in the To, CC, or BCC fields. You can select from the list instead of typing in the whole email address.
|
2.
|
Click Add Entries to add entries to the address book.
|
The Select Address Book Entries window displays on the page.
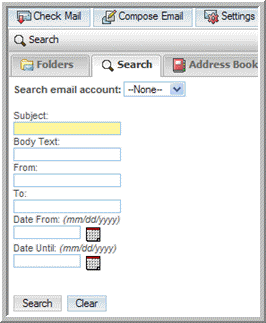
To search emails from your external mail accounts in Sugar, use the Search tab in the Folders panel. To search for imported emails assigned to you, your teams, or your direct reports, use the Emails Search panel on the Emails List page.
|
1.
|
Click All Emails in the Shortcuts menu of the Emails module. 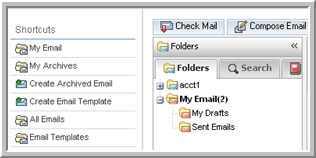
|
The Email List page displays on the screen.
You can associate an archived email with any record such as an account, opportunity, bug, or case. For example, when you associate an email with an account, the email displays in the
History sub-panel of that account. You can click on the email link in the
History sub-panel to view the details of the email.
You can also manually archive your inbound and outbound emails in Sugar. When you archive an email, you can also attach documents located in the Sugar repository or on your local machine.
|
1.
|
In the Shortcuts menu of the Emails module, click Create Archived Email.
|
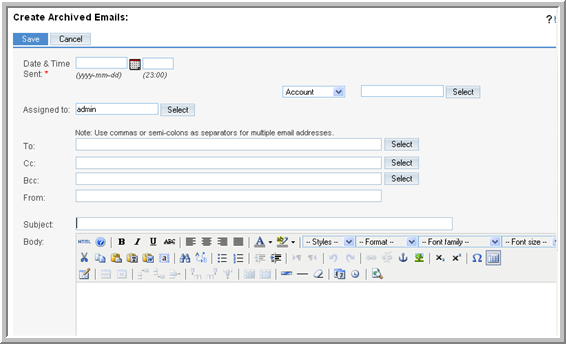
The Create Archived Emails page displays on the screen.
|
2.
|
In the Create Archived Emails form, enter information for the following fields:
|
Date & Time Sent. Click the
Calendar icon and select the date the email was sent; enter the time in the adjoining field.
Account. From this drop-down list, select a related module such as Accounts or Opportunity and click
Select to specify the record.
Assigned to. Click
Select to select the individual who is assigned to the email. By default, it is assigned to you.
To. Enter the name of the email recipient.
Cc. Enter the name of individuals copied on the email.
Bcc. Enter the names of individuals who received a blind copy of the email.
From. Enter the name of the individual who sent out the email.
Subject. Enter the subject of the email.
Body. Copy and paste the contents of the email.
Edit Plain Text. Select this box to display the email in text format if an email client cannot render HTML code.
Add File. Click this button to attach a file that is located on your machine. You can enter the path to the file or click
Browse to navigate to the file.
Add Document. Click this button to attach a file that is located in the Sugar database.
|
3.
|
Click Save to archive the email; click Cancel to exit the page without archiving the email.
|
You can use email templates to create form letters for automated email responses to inbound emails and for mass email campaigns. For example, when you receive an inbound email regarding a bug or a case, you can send out automatic reply stating that the matter will be addressed.
For email campaigns, enter the message in the template and then specify the variables such as the target names and addresses from the campaign target list. The system inserts these variables into the template to create a personalized email for each target. When you create an email template, you can embed images and attach files from the Sugar repository or from your local file system.
|
1.
|
In the Shortcuts menu, click Create Email Template.
|
Name. Enter a name for the template.
Description. Enter a brief description about the template.
Insert Variable. From the drop-down list, select a record such as contact and select a field such as
Full Name and click
Insert.
|
3.
|
Insert Tracker URL. This field displays only when you create the template from the email marketing record of an email campaign. From the drop-down list, select the tracker URL to insert and click Insert URL Reference.
|
The Body field displays a link named
Default link text. The adjoining field displays the tracker name for plain text format. Use this if you want to display the email in plain text format.
|
4.
|
Subject. Enter the title of the message.
|
|
5.
|
Body. Enter the email message. You can also embed images and add URL links.
|
|
7.
|
Send Text only. Select this box to display the email in plain text format. You can choose this option if an email client cannot render HTML code.
|
Sugar Document. Click this button to attach a document from the Sugar repository; when you select the file from the Documents List, the system attaches it to the email template.
|
9.
|
Click Save to create the template; click Cancel to exit the page without saving your changes.
|


.
Only administrators can create Group folders. Every Group folder is assigned to a user and only that individual can view the folder and its contents. Administrators use Group folders to distribute emails among users for necessary action. Typically, these are emails for product bugs and cases that are addressed to your organization and not to any particular user. You can manually place emails in the Group folder. When you move emails into a Group folder, they are imported into the Sugar database. Administrators can associate the Group folder with a Group mail account to automatically import incoming emails into the Sugar database.For information on creating Group folders, see the Sugar Express Installation and Administration Guide.You can view all local folders in the Folders tab of the Email Settings page. In order to view a folder in the Folders tab of the Emails home page, you must select it in the Folders tab of the Email Settings window.