Use the Contacts module to create and manage contacts for your organization.
A contact is any individual who is a valid sales lead; that is, a lead who has been evaluated and assessed for a possible sales opportunity. You can associate a contact with any record such as an account, opportunity, or campaign. Associating a contact with a campaign enables you to track the effectiveness of the campaign in generating opportunities for your organization.
The Shortcuts menu displays the following options:
Create Contact. Click this option to create a record for a new contact.
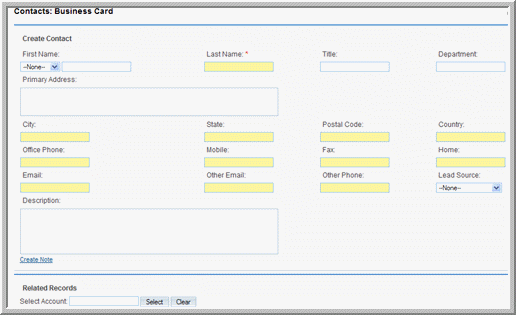
Enter Business Card. Click this option to add information from the business card of a new contact.
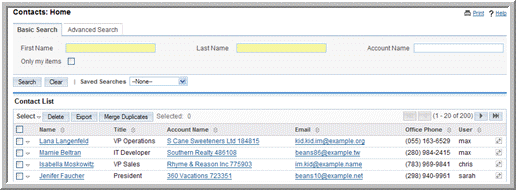
Contacts. Click this option to view a list of your existing contacts.
|
1.
|
In the Shortcuts menu, click Create Contact; alternatively, enter required information in the New Contact quick form that displays below the Shortcuts menu.
|
|
2.
|
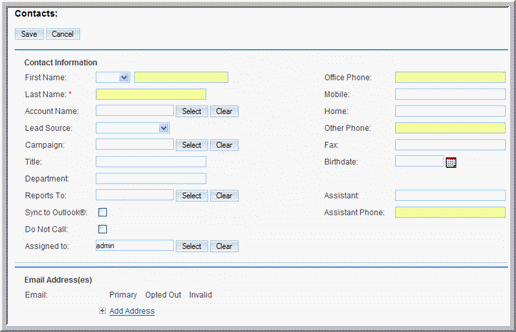
On the Contacts page, enter the following information:
|
Mobile. Enter the contact’s mobile phone number.
Account Name. Enter the account name associated with the contact; alternatively, click
Select to choose from the existing list of accounts.
Home. Enter the contact’s home phone number.
Lead Source. From the drop-down list, select the source that generated the lead, such as direct mail or trade show.
Other Phone. Enter the alternative phone number, if any.
Campaign. To associate the contact with a campaign, enter the campaign name or click Select to select it from the Campaigns list.
Title. Enter the contact’s business title.
Fax. Enter the contact’s fax number.
Department. Enter the department to which the contact belongs.
Birthdate. Click the
Calendar icon and select the contact’s birthdate.
Reports To. Click
Select and select the contact’s supervisor from the Contacts list.
Sync to Outlook. If you have installed Sugar Plug-in for Microsoft Outlook, select this box to synchronize this contact information with Outlook.
Do Not Call. Select this box to add the contact to the Do Not Call list. This is to ensure that the contact is not targeted during campaigns.
Assigned to. Select the individual who is responsible for communicating with this contact. By default, you are assigned to the contact.
Address Information: Enter the primary address and other address information. To copy information from one section to the other, you can enter the address information on either one of the sections and click the arrow buttons.
Email Address(es): Enter an email address for the contact and select
Primary. If an email address is incorrect, select
Invalid to indicate it. If you sent out campaign emails this contact and the individual chose to opt-out of receiving them, select
Opted Out.
|
3.
|
Click Save to save the record and view its detail page.
|
Click Cancel to return to the Contact’s home page without creating the new contact.
|
•
|
To manage newsletter subscriptions, on the detail page, click Manage Subscriptions. To add the individual to a newsletter subscription mailing list, select the newsletter from the Available NewsLetters list and drag it to the NewsLetters Subscribed To list. Similarly, to remove the individual from the mailing list of a newsletter, drag the newsletter from the Newsletters Subscribed to list to the Available Newsletters list. Click Save to update the information.
|
You can add a contact’s business card information to your records. The basic information is similar to the contact information. When you create a business card, in the sub-panel below, you can relate it to an existing account or you can create a new account, opportunity, or appointment.
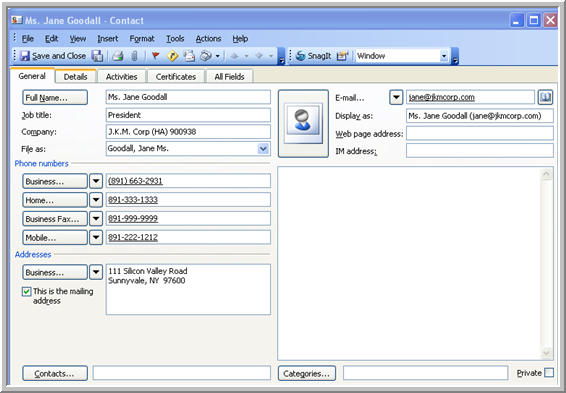
You can import a vCard file from your local file system to create a new contact in Sugar. You can also create a vCard file from a contact’s Detail View in Sugar and save it in Outlook or on your local machine.
|
1.
|
In the Shortcuts menu, click Create from vCard. 
|
|
2.
|
On the Contacts Import VCard page, click Browse to navigate to the vCard location on the local file system.
|
|
3.
|
In the Choose File dialog box, select the file and click Open.
|
The system displays a vCard button adjacent to the contact name. You can click this button to open the vCard file and edit the information.