An activity can be any interaction with colleagues and customers such as a phone call, a meeting, or an email. Use the Activities module to schedule and manage calls, meetings, and tasks.
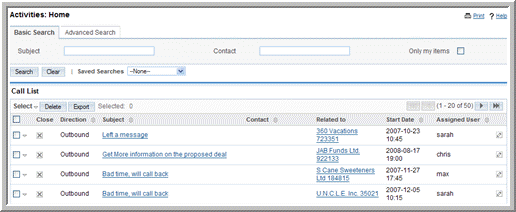
Typically, an activity is related to a record such as an account or contact. For example, you can schedule a meeting with one or more contacts to discuss a specific account or opportunity. When you create the activity, you can specify the record to which it is related. This allows you to view the scheduled activities from the specified record. For example, an account’s detail page displays all scheduled activities. When you schedule an activity, you can also create notes and attachments if necessary.
The Shortcuts menu displays the following options:
You can schedule calls and meetings with users, contacts, and leads. When you schedule a call or a meeting, you are creating a record about the subject of discussion, the participants, the time period, and the status. After you save this information, you can send out an invitation to all the participants immediately or at a later date. You can create a note or add attachments before or after a call or a meeting occurs. After you complete a call or meeting, or if you cancel it for any reason, you can update its status for the record.
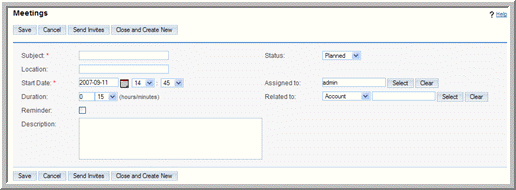
When you create the call or a meeting, the Calls page or the
Meetings page displays the following sub-panels:
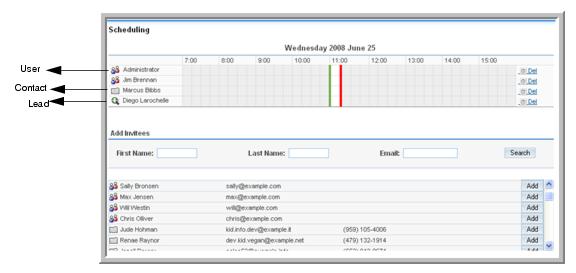
Scheduling. The Scheduling sub-panel displays details such as the name of the attendees, the day, and the time of the call or meeting. If other calls or meetings are already scheduled, the busy time is blocked out and colored blue. If there are scheduling conflicts, the busy time displays as a brown block.
|
1.
|
In the Shortcuts menu of the Calendar Home page, click Schedule Call or Schedule Meeting. Alternatively, you can use the Create Appointment quick form below the Shortcuts menu.
|
Subject. Enter the subject of discussion.
Status. From the drop-down lists, select one of the following:
Inbound. This option is for Calls only. Choose this option if it is an inbound call.
Outbound. This option is for Calls only. Choose this option if it is an outbound call.
Planned. Choose this option if the call or meeting is scheduled to take place.
Held. After a call or meeting is completed, change the status from Planned to Held.
Not Held. If a call or meeting did not occur for any reason, change the status from Planned to Not Held.
Location. For meetings, optionally, enter the meeting location.
Start Date and Time. Click the
Calendar icon and select the date; from the adjoining drop-down lists, select the time (hours and minutes).
Assigned to. Specify the user who is responsible for the call or meeting.
Duration. Enter the number of hours in the adjoining box and select the number of minutes from the drop-down list.
Related to. Optionally, enter or select the name of the related record such as an account, opportunity or contact from the drop-down list.
Reminder. Select this box and specify the default time from the drop-down list below to send a reminder when a call or meeting is due. The system will send out a reminder to all participants at the specified time.
Description. Optionally, enter a brief description for the purpose of the call or meeting.
|
3.
|
Click Save to save the call information; click Cancel to return to the Calls home page or Meetings home page without saving the information.
|
|
4.
|
Click Send Invites to send out an invitation to the participants.
|
|
1.
|
In the Add Invitees sub-panel, enter all or any of the following information for a user, contact, or lead:
|
First Name. You can add a letter, a whole name, or a partial name.
Last Name. You can add a letter, a whole name, or a partial name
Email. You can add a letter, a whole address, or a partial address.
|
•
|
To duplicate a call or meeting, click Duplicate in the detail view. Duplication is a convenient way of creating a similar activity. You can change the information in the duplicate record to create a new activity.
|
Based on your work-related activities, you can create tasks and assign them to yourself or to other users. When you create a task, you can relate it to a specific record such as an account or an opportunity. You can also revise the task status and priority at any time to keep your records up-to-date.
|
1.
|
In the Shortcuts menu of the Activities Home page, click Create Task.
|
|
2.
|
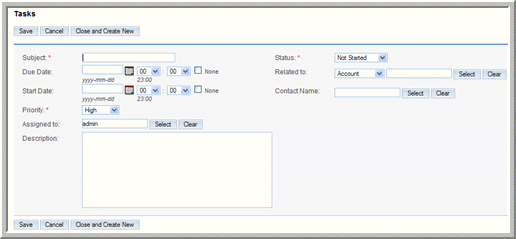
On the Tasks page, enter information in the following fields:
|
Subject. Enter the subject of the task.
Due Date. Optionally, click the
Calendar icon and select the completion date for the task; enter the time in the adjoining box. If there is no specific deadline for the task, select the
None box.
Start Date. Optionally, click the
Calendar icon and select the start date for the task; enter the time in the adjoining box.
Priority. From the drop-down list, select a priority that reflects the importance of completing the task.
Assigned to. Click
Select to select the individual who is the lead. By default, it is assigned to you.
Status. From the drop-down list, select the current status of the task, such as Not Started, In Progress, and Completed.
Related to. Enter the name of the related account or click
Select to search for one. Instead of an account, you can choose another related record such as an opportunity or contact from the drop-down list.
Contact Name. Click
Select to select a specific individual who is the contact for the task. By default, it is assigned to you.
|
3.
|
Click Save to create the task; click Cancel to exit the page without creating the task.
|
|
•
|
To duplicate the information, on the detail page, click Duplicate, make modifications if needed, and click Save; click Cancel to exit the page without duplicating the task. Duplication is a convenient way of creating a similar task. You can change the information in the duplicate record to create a new task.
|
You can create or import notes related to a specific call, meeting, or task for distribution to participants. Notes enable you to add comments on a subject and maintain a record of discussions pertaining to a call, meeting, or task. You can also attach supporting documents to a note.
|
1.
|
In the Shortcuts menu, click Create Note or Attachment.
|
|
2.
|
On the Notes page, enter information for the following fields:
|
Contact. Enter the name of the contact. Click
Select to choose one from the Contacts list or to search for a contact in the list.
Account. Optionally, enter the name of the related account or click
Select to search for one. Instead of an account, you can choose another related record such as an opportunity or contact from the drop-down list.
Subject. Enter the subject of the note.
Attachment. To attach a document that is located on your machine, click
Browse, navigate to the location of the file, and select the file.
Note. Enter the text of the note in this box.
|
3.
|
Click Save to create the note or attachment; click Cancel to return to the Notes home page without saving your changes.
|
|
•
|
To duplicate the information, click Duplicate, make modifications if needed, and click Save; click Cancel to return to the Notes list without duplicating it. Duplication is a convenient way of creating a similar note. You can change the information in the duplicate record to create a new note.
|
|
•
|
To delete the note, click Delete and click OK to confirm the deletion.The system deletes the note and returns to the Notes list.
|


icon beside it; to reverse the sort order, click the column title again.