You can use the import functionality to import new data into Sugar as well as to update existing data. You can import data from CRM systems such as Salesforce.com, Contact Managers such as ACT!2005, and from Microsoft Excel. The import file can be a comma delimited or tab delimited file.
To import data from your previous CRM application or Contact Manager, you must first export the data from that application in a Comma Separated Values (.csv) file format to your local file system. You can then use the import function within a specific module to import the .csv file data into Sugar.
|
•
|
Accounts: Comma delimited, tab delimited files, custom delimited file, Jigsaw, Salesforce.com, and ACT!.
|
|
•
|
Contacts: Comma delimited, tab delimited files, custom delimited file, Microsoft Outlook, Salesforce.com, and ACT!.
|
|
•
|
Targets: Comma delimited, tab delimited files, and custom delimited files.
|
|
•
|
Notes: Comma delimited, tab delimited files, custom delimited files, and Salesforce.com.
|
|
•
|
Users. Comma delimited, tab delimited files, custom delimited files, and Salesforce.com.
|
When you import data, you will need to map fields that you are importing to fields that exist in the Sugar database. For example, to map the first and last names of contacts that you import into Sugar, these fields must exist in the Sugar database. If not, you will need to create these fields in Sugar before you import the data.
The last stage of the import process provides the option to view your import file settings under Advanced Options. Advanced Options lists the default settings in your My Account page. Ensure that the File Encoding format, the Date format, and the Time format match those in the import file. If not, change the settings under Advanced Options before you import the data. For example, if the import file is using EUC-JP and your default setting is UTF-8, you will need to change the default setting to EUC-JP.
File Encoding allows you to use an import file that is in another language. That is, a file with a different character encoding than what is specified for the Sugar instance. During the import, if the user selects the appropriate file encoding, then the data will be imported with the encoding specified for the Sugar instance.
You can save mappings for future use. You can also publish saved mappings to enable other users to use them. In the process of mapping data, you can assign a record to a user.
If you are importing account data from another CRM system, typically, that system understands the distinction between a contact and an account – that one account can have multiple contacts, and has separate data for each contact. However, you can import just contact data from simpler Contact Manager applications– such as Microsoft Outlook. For more information, see
“Importing Contact Data” on page 131.
If you are importing account data from a CRM system, proceed to step 4. If you exported contact data, and want to import it as account data into Sugar, do the following:
|
2.
|
Edit the Accounts.csv file using Excel. First, sort the file on the column which contains the company name.
|
As you scroll through your data, sorted by company name, you may see successive records which have the same company name if there is more than one contact from that account (in Sugar’s terminology). To avoid multiple copies of the same account within Sugar, you need to delete the duplicate contacts. And to make sure that the most complete information is attached to the account record, retain only the contact whose address and telephone information best represents the account as a whole.
If you import a contact record that refers to an unknown account, then a new contact record is automatically created for an account of that name. Note that when account records are created automatically in this fashion, they are empty. That is, they have associated contacts but no address or telephone information. Therefore, you will need to manually add those details later. To avoid this task, it is recommended that you import the account data first to create complete records with address and telephone information (and other information depending on your previous CRM system) and then import contact data.
|
2.
|
Select Export to a file and click Next.
|
During import, ensure that you correctly map the names of the incoming fields with the names of the corresponding Sugar fields. If you are importing from Outlook, a particularly important field mapping is the incoming
Company field to the
Account Name field within Sugar. This is required to ensure that contacts are associated with the correct accounts.
|
1.
|
In the Shortcuts menu of the module’s home page, click Import.
|
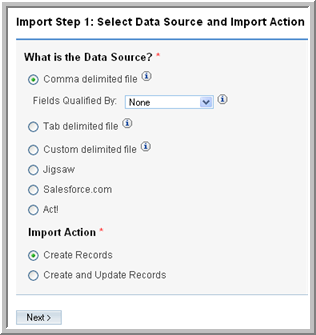
Comma Delimited File. Select this option if the fields in the import file are separated by a comma or if the file is in .csv format.
Fields Qualified By: Identify the qualifier, if any, enclosing each field including delimiters in the import file. When you export Sugar records, the system uses double quotes as the qualifier.
None. The import file does not contain any qualifiers.
Double Quotes. The import file contains double quote as qualifiers. For example:
“abc”,“xyz”,“efg”.
Single Quotes. The import file contains single quotes as qualifiers. For example:
‘abc’,‘xyz’,‘efg’.
Other. The import file contains a qualifier other than single quotes or double quotes.
Tab Delimited File. Select this option if the fields in the import file are separated by a tab and the file extension is .txt.
Custom Delimited File. Select this option if the import file uses a delimiter other than a comma or a tab. Enter the delimiter in the
Fields Delimited By field and enter the delimiter in the adjacent field.
Jigsaw. Select this option if the import file is located in the Jigsaw database.
Salesforce.com. Select this option if the import file is located in the Salesforce.com database. Instructions to import from Salesforce display on the screen.
Act!2005. This option is available only for Sugar modules that are mapped to a corresponding module in ACT and the import data is located in the Act! 2005 database.
|
3.
|
Under Import Action, select one of the following:
|
Create and Update Records: Select this option to create new records and update existing records with new values. To update records, the import file must contain the record IDs.
|
4.
|
Click Next to proceed to the next step in the import process.
|
|
5.
|
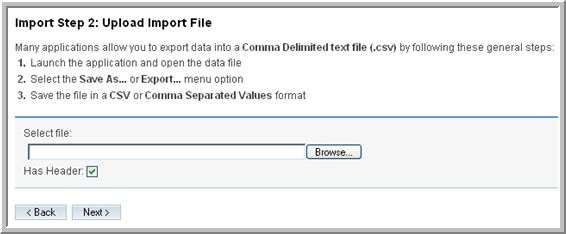
In the Select file field, enter the path to the file location; or click Browse to navigate to the file location on your machine.
|
|
7.
|
Click Next to proceed to the next step in the import process.
|
The Database Field column displays a drop-down list of all fields that exist in the Sugar database for the module. The system automatically finds possible matches for the field names in the Header row and selects them in the Database Field column. For unmapped fields, the
Do not map this field option displays in the Database Field column. You can change the mapping if needed. If you do not want to map a field, select
Do not map this field.
The Header Row column displays the field titles in the header row of the import file.
The Default Value column provides the option to enter a value if the import file does not contain a value for the field. For example, when you import Leads, you can select the default value for the Lead Source, such as Direct Mail, Trade Show, and so on from the drop-down list in the
Default Value column.
Row 1 displays the data from the first non-header field in the import file.
|
11.
|
To check for duplicate entries, click Show Advanced Options. To check for duplicates using fields such as Assigned users, move the desired indexes from the Index(es) Not Used column to the Index(es) Used column using the left arrow button.
|
|
12.
|
Click Import Now to import the data.
|
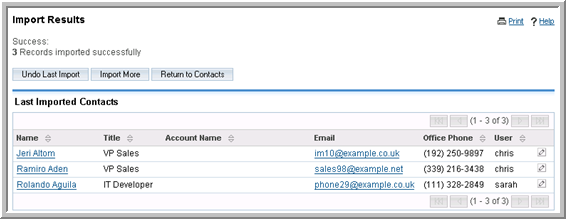
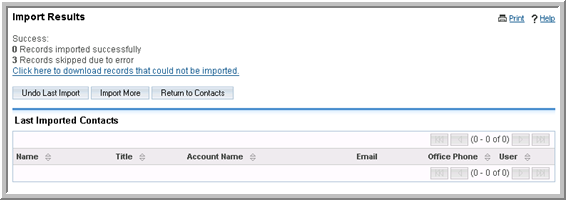
The Import Results page lists the imported data and lists how many fields were successfully imported and how many were skipped.